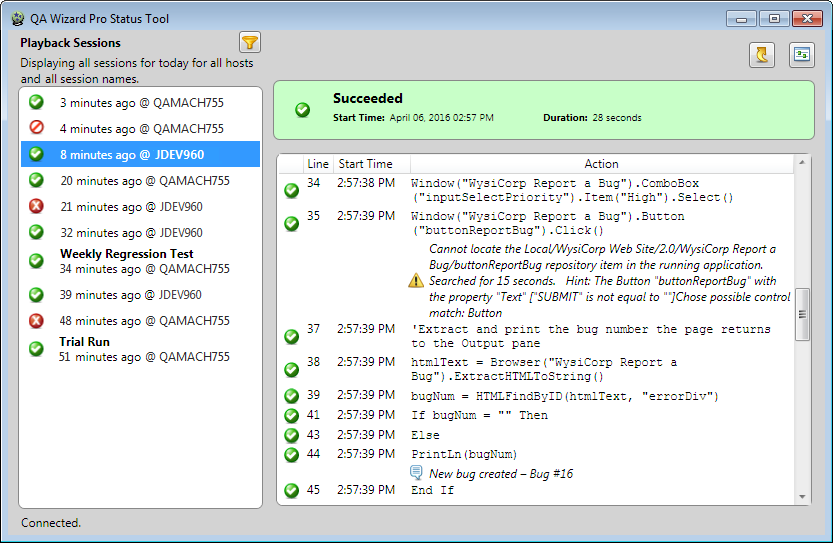
You can review script playback line-by-line in the QA Wizard Pro status tool. It displays detailed information about playback sessions, such as the current run state, the computer scripts ran on, how long they ran, any errors or warnings that occurred, and script steps grouped by the window an action was performed on.
You can install the status tool on any computer to monitor local and remote sessions in real-time.
After reviewing playback information, you can export individual session reports to save the information in various formats. You can then share these reports with developers to provide helpful information for fixing issues found during testing.
Tip: You can also use the dashboard to monitor playback information and statistics in a web browser, which can help you quickly identify failed sessions that may need closer review in the status tool. See Viewing playback information in the dashboard.
1. To start the status tool, choose Start > All Programs > Perforce > QA Wizard Pro > QA Wizard Pro Status Tool.
The status tool opens.
Note: The status tool requires a connection to a QA Wizard Pro Server. If it cannot connect to the server, you may need to update the connection information. Click  , enter the server address and port number, and click OK.
2. Select a playback session to view the results.
3. To change the sessions displayed, click  and select the filter options.
If the status tool was opened from the dashboard, only the corresponding session is displayed. You can update the filter options to view other sessions.
| Option | Displays: |
|---|---|
| Date | Sessions run during the selected date range.
|
| Run state | Sessions in the selected state, which is the status of a session during or after playback. You can include active sessions that are running, successful sessions, failed sessions, inactive sessions that did not send information to the server in over 30 minutes, or sessions canceled by the user who started them. |
| Test computers | Sessions run on the selected computers. Click Select All to select all test computers or click Select None to clear all selected computers. |
| Session name | Sessions by name. You can include sessions with names that equal, start with, end with, contain, do not equal, or do not contain specific text. Select Ignore case to ignore the case of the entered text. |
4. Click  to save the session report.
Choose the location to save the report in, enter a file name, and select a file type. Reports can be saved as CSV, XLSX, and DOCX files.
    |

|